Kafka를 설치 및 연동해보자 (with NestJS)
Kafka를 로컬에 띄우고 NestJS에서 메시지를 보내고 받는 흐름을 정리했습니다. 목표는 HTTP 요청으로 메시지를 발행하고, Consumer의 처리 로그와 그룹 offset까지 확인하는 것입니다. 개념부터 보고 싶다면 Kafka가 뭐야?를 먼저 읽어보세요.
 Apache Kafka
설치 부분은 2023년 당시 사용한 Kafka 2.8.0 + ZooKeeper 구성을 재현하는 로컬 학습 예제입니다. Kafka 4.0부터는 ZooKeeper 모드가 제거됐으므로 신규 환경에서는 해당 버전의 KRaft 설치 문서를 사용하세요. 아래 코드는 KafkaJS 2.2.4, NestJS 11.1.6, TypeScript 5.9.3 조합에서 6개 파일 전체의 strict 타입 검사를 통과했습니다. 실제 Broker를 연결한 통합 검증과 운영용 클러스터 설정은 포함하지 않습니다. Kafka 4.0 변경 사항
1. 로컬 Kafka 준비
Kafka 2.8의 안내는 Java 8 이상을 전제로 합니다. 해당 버전을 재현할 호환 JDK를 준비하고 java -version으로 실제 사용 중인 버전을 확인하세요. 최신 JDK와의 호환성을 이 글이 보장하는 것은 아닙니다. Kafka 2.8 Quick Start
1
2
3
wget https://archive.apache.org/dist/kafka/2.8.0/kafka_2.13-2.8.0.tgz
tar xvf kafka_2.13-2.8.0.tgz
cd kafka_2.13-2.8.0
실습은 같은 머신의 localhost:9092를 사용합니다. 외부에 노출하는 서버 설정으로 그대로 사용하지 마세요. config/server.properties에 아래 항목이 있다면 값을 바꾸고, 없으면 추가해 로컬 주소를 명시할 수 있습니다.
1
2
listeners=PLAINTEXT://127.0.0.1:9092
advertised.listeners=PLAINTEXT://localhost:9092
listeners는 Broker가 연결을 받을 주소이고, advertised.listeners는 클라이언트에 알려줄 주소입니다. Docker 안의 애플리케이션은 localhost가 호스트 머신을 뜻하지 않으므로 그 경우에는 별도 네트워크 구성이 필요합니다. Kafka 2.8 Broker 설정
ZooKeeper와 Broker 실행
1
2
bin/zookeeper-server-start.sh -daemon config/zookeeper.properties
bin/kafka-server-start.sh -daemon config/server.properties
ZooKeeper는 이 과거 구성에서 클러스터 메타데이터 등을 관리합니다. KafkaJS 애플리케이션이 메시지를 주고받는 대상은 Kafka Broker입니다.
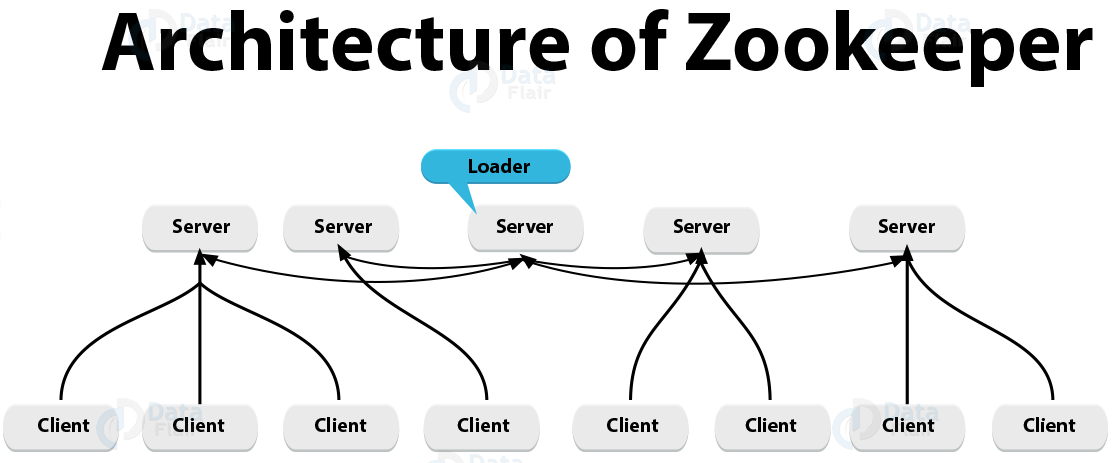 Kafka 2.8의 ZooKeeper 기반 구성을 이해하기 위한 당시 자료
명령이 반환됐다고 준비가 끝난 것은 아닙니다. 아래 Topic 생성 요청이 성공하는지 확인하고, 실패하면 Kafka의 logs/server.log부터 봅니다.
1
2
3
4
5
6
7
8
9
bin/kafka-topics.sh --create \
  --topic test-topic \
  --partitions 1 \
  --replication-factor 1 \
  --bootstrap-server localhost:9092

bin/kafka-topics.sh --describe \
  --topic test-topic \
  --bootstrap-server localhost:9092
Partition 하나와 복제본 하나는 실습을 단순하게 하기 위한 선택입니다. 이 구성으로 장애 복구나 고가용성을 검증할 수는 없습니다. 이미 같은 Topic이 있다면 새로 만들지 말고 --describe로 설정을 확인하세요.
NestJS 전에 CLI로 통신 확인
서로 다른 터미널에서 각각 실행합니다. Producer에 hello-cli를 입력하고 Enter를 누른 뒤 Consumer에서 같은 값을 확인하세요.
1
2
3
bin/kafka-console-producer.sh \
  --topic test-topic \
  --bootstrap-server localhost:9092
1
2
3
4
bin/kafka-console-consumer.sh \
  --topic test-topic \
  --from-beginning \
  --bootstrap-server localhost:9092
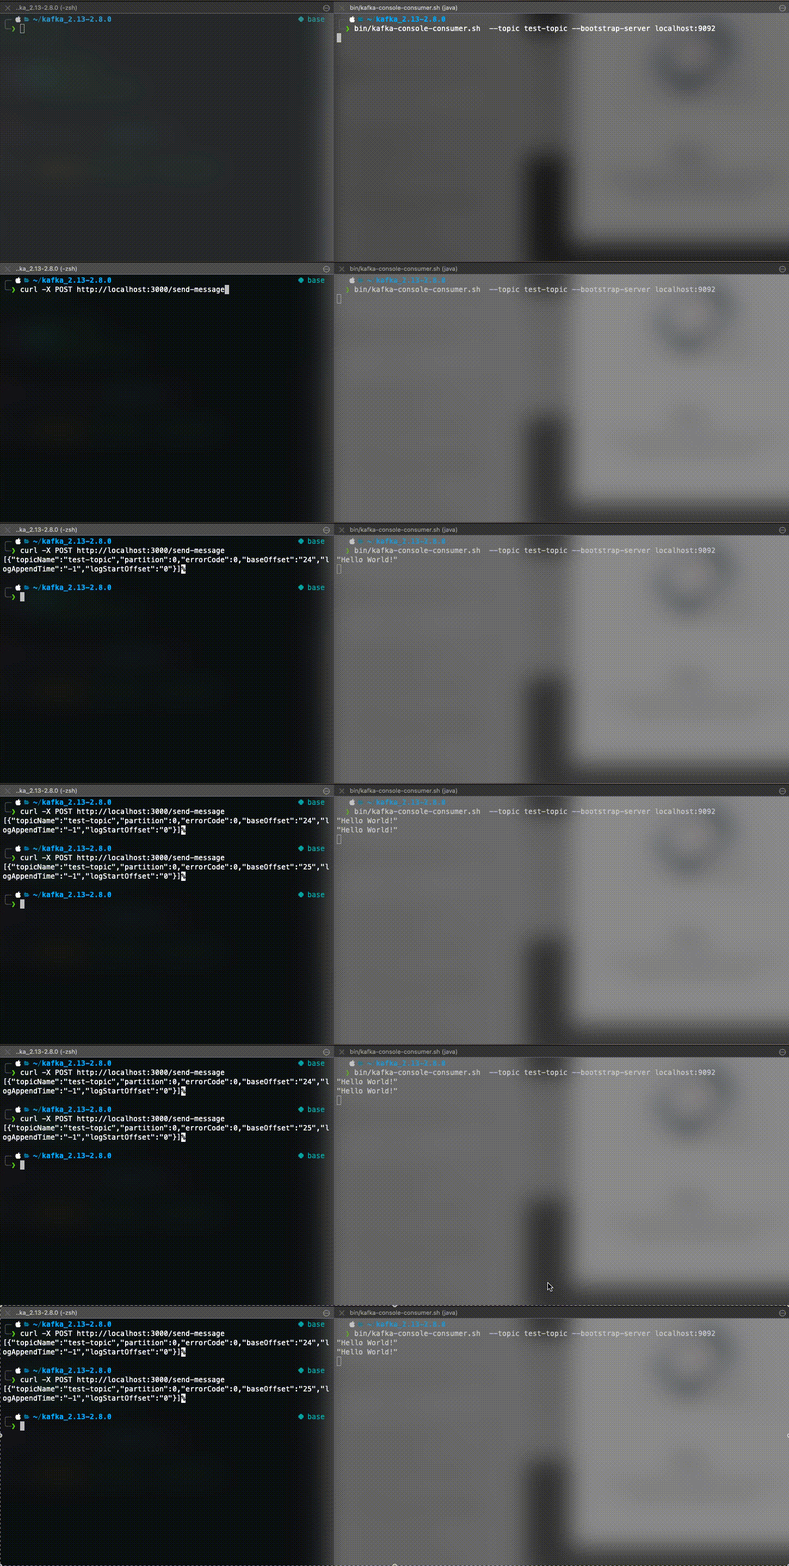
 당시 CLI Producer 테스트 화면
 당시 CLI Consumer 테스트 화면
여기서 실패하면 NestJS 코드를 바꾸기 전에 Broker 주소·포트·Topic 상태부터 해결합니다. CLI 확인이 끝나면 두 프로그램을 Ctrl+C로 종료해 이후 로그와 섞이지 않게 합니다.
2. NestJS에서 연결의 생명주기 관리하기
기존 TypeScript NestJS 프로젝트에서 KafkaJS를 설치합니다. 프로젝트가 사용하는 패키지 매니저 하나만 사용하면 됩니다.
1
npm install kafkajs@2.2.4
아래 예제는 기본 NestJS 프로젝트의 src에 파일을 둔다는 가정입니다. Topic과 handler 하나를 등록하는 학습용 구조예요. 메시지마다 연결을 열고 닫지 않고 모듈 초기화 때 연결하고, 애플리케이션이 준비된 뒤 구독을 시작하고, 종료 때 연결을 닫습니다. NestJS 생명주기 훅
kafka.service.ts
1
2
3
4
5
6
7
8
9
10
11
12
13
14
15
16
17
18
19
20
21
22
23
24
25
26
27
28
29
30
31
32
33
34
35
36
37
38
39
40
41
42
43
44
45
46
47
48
49
50
51
52
53
54
55
56
57
58
59
60
61
62
63
64
65
66
67
68
69
70
71
72
73
74
75
76
77
78
79
80
81
82
83
84
85
86
87
88
import {
  Inject,
  Injectable,
  OnModuleDestroy,
  OnModuleInit,
} from '@nestjs/common';
import {
  Consumer,
  EachMessageHandler,
  Kafka,
  Partitioners,
  Producer,
} from 'kafkajs';

export const KAFKA_CONFIG = Symbol('KAFKA_CONFIG');

export interface KafkaConfig {
  clientId: string;
  brokers: string[];
  groupId: string;
  topic: string;
}

@Injectable()
export class KafkaService implements OnModuleInit, OnModuleDestroy {
  private readonly producer: Producer;
  private readonly consumer: Consumer;
  private consumerStarted = false;

  constructor(@Inject(KAFKA_CONFIG) private readonly config: KafkaConfig) {
    const kafka = new Kafka({
      clientId: config.clientId,
      brokers: config.brokers,
    });

    this.producer = kafka.producer({
      createPartitioner: Partitioners.DefaultPartitioner,
      allowAutoTopicCreation: false,
    });
    this.consumer = kafka.consumer({
      groupId: config.groupId,
      allowAutoTopicCreation: false,
    });
  }

  async onModuleInit(): Promise<void> {
    try {
      await this.producer.connect();
      await this.consumer.connect();
    } catch (error) {
      // 초기 연결이 일부만 성공했더라도 열린 연결을 정리합니다.
      await Promise.allSettled([
        this.consumer.disconnect(),
        this.producer.disconnect(),
      ]);
      throw error;
    }
  }

  async startConsumer(handler: EachMessageHandler): Promise<void> {
    if (this.consumerStarted) {
      throw new Error('Consumer handler is already registered');
    }
    this.consumerStarted = true;

    await this.consumer.subscribe({
      topics: [this.config.topic],
      fromBeginning: true,
    });
    await this.consumer.run({ eachMessage: handler });
  }

  async sendMessage(value: string, key?: string) {
    return this.producer.send({
      topic: this.config.topic,
      acks: -1,
      messages: [{ key, value }],
    });
  }

  async onModuleDestroy(): Promise<void> {
    try {
      await this.consumer.disconnect();
    } finally {
      await this.producer.disconnect();
    }
  }
}
자동 Topic 생성을 끈 이유는 이름 오타로 별도 Topic이 생겨 송수신이 엇갈리는 문제를 피하기 위해서입니다. Topic은 앞에서 명시적으로 만들었습니다. acks: -1은 현재 ISR의 확인을 기다리는 설정이며 Consumer의 처리가 끝났다는 뜻은 아닙니다. 복제본이 하나인 이 실습에서는 복제에 의한 내구성도 얻지 못합니다. KafkaJS Producer 설정
kafka.module.ts
인터페이스는 런타임에 사라지므로 설정 객체를 주입할 때는 별도 토큰을 사용합니다. 모듈에서 그 토큰과 실제 값을 연결합니다. NestJS custom provider
1
2
3
4
5
6
7
8
9
10
11
12
13
14
15
16
import { DynamicModule, Module } from '@nestjs/common';
import { KAFKA_CONFIG, KafkaConfig, KafkaService } from './kafka.service';

@Module({})
export class KafkaModule {
  static register(config: KafkaConfig): DynamicModule {
    return {
      module: KafkaModule,
      providers: [
        { provide: KAFKA_CONFIG, useValue: config },
        KafkaService,
      ],
      exports: [KafkaService],
    };
  }
}
app.service.ts
모든 모듈의 초기화가 끝난 후 실행되는 onApplicationBootstrap에서 구독을 시작합니다. KafkaJS는 메시지 값뿐 아니라 topic, partition, offset을 제공하므로 함께 남겨야 수신 여부와 재처리를 구분하기 쉽습니다.
1
2
3
4
5
6
7
8
9
10
11
12
13
14
15
16
17
18
19
20
21
22
23
24
25
import { Injectable, OnApplicationBootstrap } from '@nestjs/common';
import { KafkaService } from './kafka.service';

@Injectable()
export class AppService implements OnApplicationBootstrap {
  constructor(private readonly kafka: KafkaService) {}

  async onApplicationBootstrap(): Promise<void> {
    await this.kafka.startConsumer(async ({ topic, partition, message }) => {
      console.log({
        topic,
        partition,
        offset: message.offset,
        key: message.key?.toString() ?? null,
        value: message.value?.toString() ?? null,
      });
      // 실제 업무 처리도 이 handler 안에서 await 해야 합니다.
    });
  }

  async sendMessage() {
    await this.kafka.sendMessage('Hello World!', 'demo-key');
    return { published: true };
  }
}
fromBeginning: true는 해당 그룹의 유효한 commit offset이 없을 때 보관된 가장 이른 위치부터 읽는 옵션입니다. 같은 그룹으로 재시작할 때마다 모든 메시지를 다시 읽는다는 뜻은 아닙니다. 또한 eachMessage의 자동 offset 관리는 handler가 업무를 실제로 마쳤다는 전제가 필요합니다. 비동기 업무를 await하지 않거나 오류를 삼키고 정상 반환하면 실패한 처리를 성공으로 취급할 수 있어요. KafkaJS Consumer와 offset 설명
app.controller.ts
실행 경로가 빠지지 않도록 고정된 실습 메시지를 발행하는 HTTP endpoint를 추가합니다. 사용자 입력이나 임의의 Topic을 받는 운영 API는 아닙니다.
1
2
3
4
5
6
7
8
9
10
11
12
import { Controller, Post } from '@nestjs/common';
import { AppService } from './app.service';

@Controller('messages')
export class AppController {
  constructor(private readonly appService: AppService) {}

  @Post()
  sendMessage() {
    return this.appService.sendMessage();
  }
}
app.module.ts와 main.ts
1
2
3
4
5
6
7
8
9
10
11
12
13
14
15
16
17
18
19
// app.module.ts
import { Module } from '@nestjs/common';
import { KafkaModule } from './kafka.module';
import { AppController } from './app.controller';
import { AppService } from './app.service';

@Module({
  imports: [
    KafkaModule.register({
      clientId: 'nest-kafka-demo',
      brokers: ['localhost:9092'],
      groupId: 'nest-demo-group',
      topic: 'test-topic',
    }),
  ],
  controllers: [AppController],
  providers: [AppService],
})
export class AppModule {}
1
2
3
4
5
6
7
8
9
10
11
12
13
14
// main.ts
import { NestFactory } from '@nestjs/core';
import { AppModule } from './app.module';

async function bootstrap() {
  const app = await NestFactory.create(AppModule);
  app.enableShutdownHooks();
  await app.listen(3000, '127.0.0.1');
}

bootstrap().catch((error) => {
  console.error(error);
  process.exit(1);
});
enableShutdownHooks()는 프로세스 종료 신호에서 Nest 종료 훅이 실행되도록 합니다. SIGKILL처럼 정리 기회를 주지 않는 종료까지 처리해주는 것은 아닙니다. Nest 종료 훅
3. 발행·수신·재시작을 각각 검증하기
1
npm run start
다른 터미널에서 요청합니다.
1
curl -i -X POST http://127.0.0.1:3000/messages
Nest의 기본 POST 응답 상태는 201이며 본문에는 {"published":true}가 반환됩니다. 이는 Broker의 발행 확인을 받은 것이지 Consumer의 업무 처리가 성공했다는 뜻은 아닙니다. 애플리케이션 로그에서 Hello World!와 topic, partition, offset이 출력되는지도 따로 확인하세요.
 2023년에 기록한 발행 테스트 화면. 개정한 코드의 새로운 실행 결과는 아님
다음 명령으로 그룹의 commit 위치와 lag를 확인할 수 있습니다. Kafka 배포 디렉터리에서 실행합니다.
1
2
3
4
bin/kafka-consumer-groups.sh \
  --bootstrap-server localhost:9092 \
  --describe \
  --group nest-demo-group
검증은 다음 순서로 하면 됩니다.
- 메시지를 발행하고 Consumer의 출력과 commit 진행을 확인합니다.
- 앱을 정상 종료한 뒤 같은 group ID로 재시작합니다. 정상 commit한 위치 이후에서 이어 읽는지 확인합니다.
- 보관된 이전 메시지를 독립적으로 다시 보고 싶으면 학습용으로 새 group ID를 지정해 시작합니다.
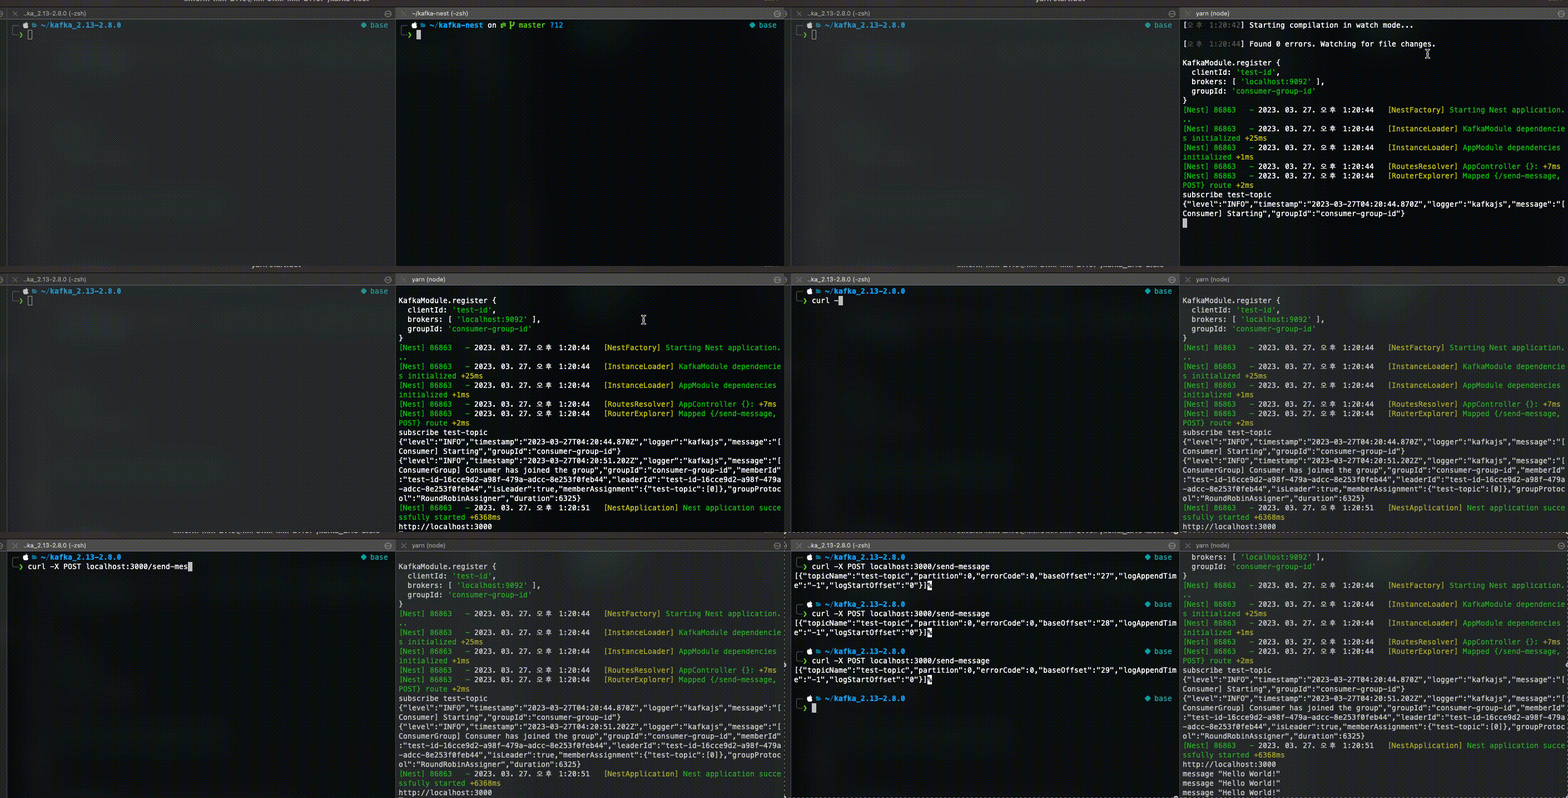 2023년에 기록한 구독 테스트 화면
처리 성공 직후 commit 전에 프로세스가 죽으면 같은 이벤트가 다시 전달될 수 있습니다. 따라서 실제 DB 변경을 넣을 때는 이벤트 ID 등을 이용한 멱등성 설계를 추가해야 합니다. 위 로그 출력 예제는 exactly-once 처리를 구현한 것이 아닙니다.
연결은 되는데 처리가 안 될 때
| 증상 | 먼저 확인할 것 |
|---|---|
| Broker에 연결하지 못함 | Broker 준비 상태, 포트, 실제 클라이언트에서 접근 가능한 advertised 주소 |
| 발행은 성공했는데 특정 앱이 받지 못함 | Topic 이름, group ID, 같은 그룹의 다른 Consumer가 Partition을 맡았는지 |
| 재시작해도 예전 메시지가 안 나옴 | 해당 그룹에 이미 commit offset이 있는지, 데이터가 아직 보관돼 있는지 |
| 처리 중 rebalance가 반복됨 | handler 소요 시간과 session timeout, heartbeat 처리 |
| 특정 메시지에서 계속 실패함 | payload와 업무 오류, 재시도·실패 격리 정책 및 Consumer crash 로그 |
긴 작업에서는 eachMessage가 session timeout을 넘기지 않도록 heartbeat와 처리 전략을 검토해야 합니다. 오류를 throw했다고 모든 실패가 원하는 정책대로 영원히 재시도되는 것도 아니므로 KafkaJS의 재시작 동작과 애플리케이션의 실패 처리를 구분하세요. KafkaJS Consumer 제약
실습을 끝내면 Nest 앱을 종료하고 로컬 Broker, ZooKeeper 순서로 정리합니다.
1
2
bin/kafka-server-stop.sh
bin/zookeeper-server-stop.sh
이 예제에서 얻어야 할 것은 “Hello World가 출력됐다”보다 연결·발행 확인·업무 처리·commit이 서로 다른 단계라는 이해입니다. 이 경계를 구분해야 운영 코드에서 누락과 중복을 어디서 다룰지도 정할 수 있습니다.