Kafka를 설치 및 연동해보자 (with NestJS)
Kafka 설치부터 NestJS 연동까지 전체 과정 정리
Kafka를 설치 및 연동해보자 (with NestJS)
 Apache Kafka
Kafka 설치부터 NestJS 연동까지 전체 과정을 정리했어요. Kafka의 기본 개념이 궁금하다면 카프카(kafka)란? 글을 먼저 읽어보세요.
설치 방법
Kafka 다운로드
1
2
3
wget https://archive.apache.org/dist/kafka/2.8.0/kafka_2.13-2.8.0.tgz
tar xvf kafka_2.13-2.8.0.tgz
cd kafka_2.13-2.8.0
Zookeeper 구동
1
bin/zookeeper-server-start.sh -daemon config/zookeeper.properties
Zookeeper는 분산 애플리케이션의 코디네이션 서비스로 Kafka 클러스터의 메타데이터를 관리해요.
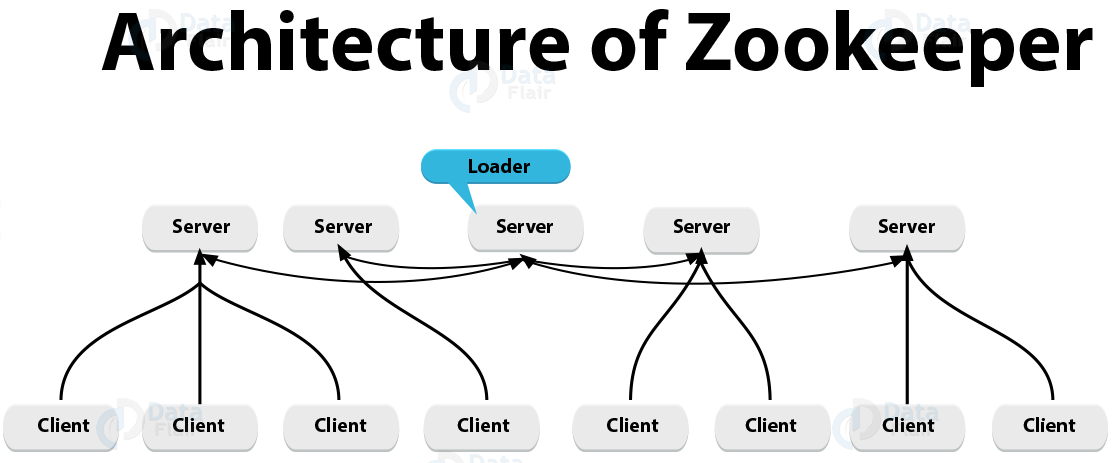 Zookeeper 아키텍처 구조
Kafka 구동
1
bin/kafka-server-start.sh -daemon config/server.properties
동작 테스트
1
2
3
4
5
6
7
8
9
10
11
# 토픽 생성
bin/kafka-topics.sh --create --topic test-topic --bootstrap-server localhost:9092

# 토픽 리스트 확인
bin/kafka-topics.sh --list --zookeeper localhost:2181

# 메시지 발행
bin/kafka-console-producer.sh --topic test-topic --bootstrap-server localhost:9092

# 메시지 구독
bin/kafka-console-consumer.sh --topic test-topic --from-beginning --bootstrap-server localhost:9092
 Producer를 통한 메시지 발행
 Consumer를 통한 메시지 구독
NestJS와 연동하기
kafkajs 설치
1
yarn add kafkajs
Kafka Service 생성
1
2
3
4
5
6
7
8
9
10
11
12
13
14
15
16
17
18
19
20
21
22
23
24
25
26
27
28
29
30
31
32
33
34
import { Injectable, OnModuleDestroy, OnModuleInit } from '@nestjs/common';
import { Kafka, Producer, Partitioners, Consumer } from 'kafkajs';

@Injectable()
export class KafkaService implements OnModuleInit, OnModuleDestroy {
  private kafka: Kafka;
  private producer: Producer;
  private consumer: Consumer;

  constructor(private kafkaConfig: KafkaConfig) {
    this.kafka = new Kafka({
      clientId: this.kafkaConfig.clientId,
      brokers: this.kafkaConfig.brokers,
    });
    this.producer = this.kafka.producer({
      createPartitioner: Partitioners.DefaultPartitioner,
      allowAutoTopicCreation: true,
    });
    this.consumer = this.kafka.consumer({
      allowAutoTopicCreation: true,
      groupId: this.kafkaConfig.groupId,
    });
  }

  async sendMessage(kafkaTopic: string, kafkaMessage) {
    await this.producer.connect();
    const metadata = await this.producer.send({
      topic: kafkaTopic,
      messages: [{ value: JSON.stringify(kafkaMessage) }],
    });
    await this.producer.disconnect();
    return metadata;
  }
}
Kafka Module 생성
1
2
3
4
5
6
7
8
9
10
11
12
13
14
15
16
17
@Global()
@Module({})
export class KafkaModule {
  static register(kafkaConfig: KafkaConfig): DynamicModule {
    return {
      global: true,
      module: KafkaModule,
      providers: [
        {
          provide: KafkaService,
          useValue: new KafkaService(kafkaConfig),
        },
      ],
      exports: [KafkaService],
    };
  }
}
App Module에 Import
1
2
3
4
5
6
7
8
9
10
@Module({
  imports: [
    KafkaModule.register({
      clientId: `test-id`,
      brokers: ['localhost:9092'],
      groupId: 'consumer-group-id',
    }),
  ],
})
export class AppModule {}
Producer 사용
1
2
3
4
5
6
7
8
@Injectable()
export class AppService {
  constructor(private readonly kafkaService: KafkaService) {}

  async sendMessage() {
    return this.kafkaService.sendMessage('test-topic', 'Hello World!');
  }
}
 NestJS Producer 테스트 결과
Consumer Decorator 사용
1
2
3
4
5
6
7
@Injectable()
export class AppService {
  @SubscribeTo('test-topic')
  async subscribeToTestTopic(message: string) {
    console.log('message', message);
  }
}
 NestJS Consumer 테스트 결과
자세한 내용은 Kafka 공식 문서를 확인해 보세요.
This post is licensed under
CC BY 4.0
by the author.